CortexBrain Documentation
Complete guide to installing, configuring, and using CortexBrain — the enterprise AI memory system that gets smarter every time someone corrects it.
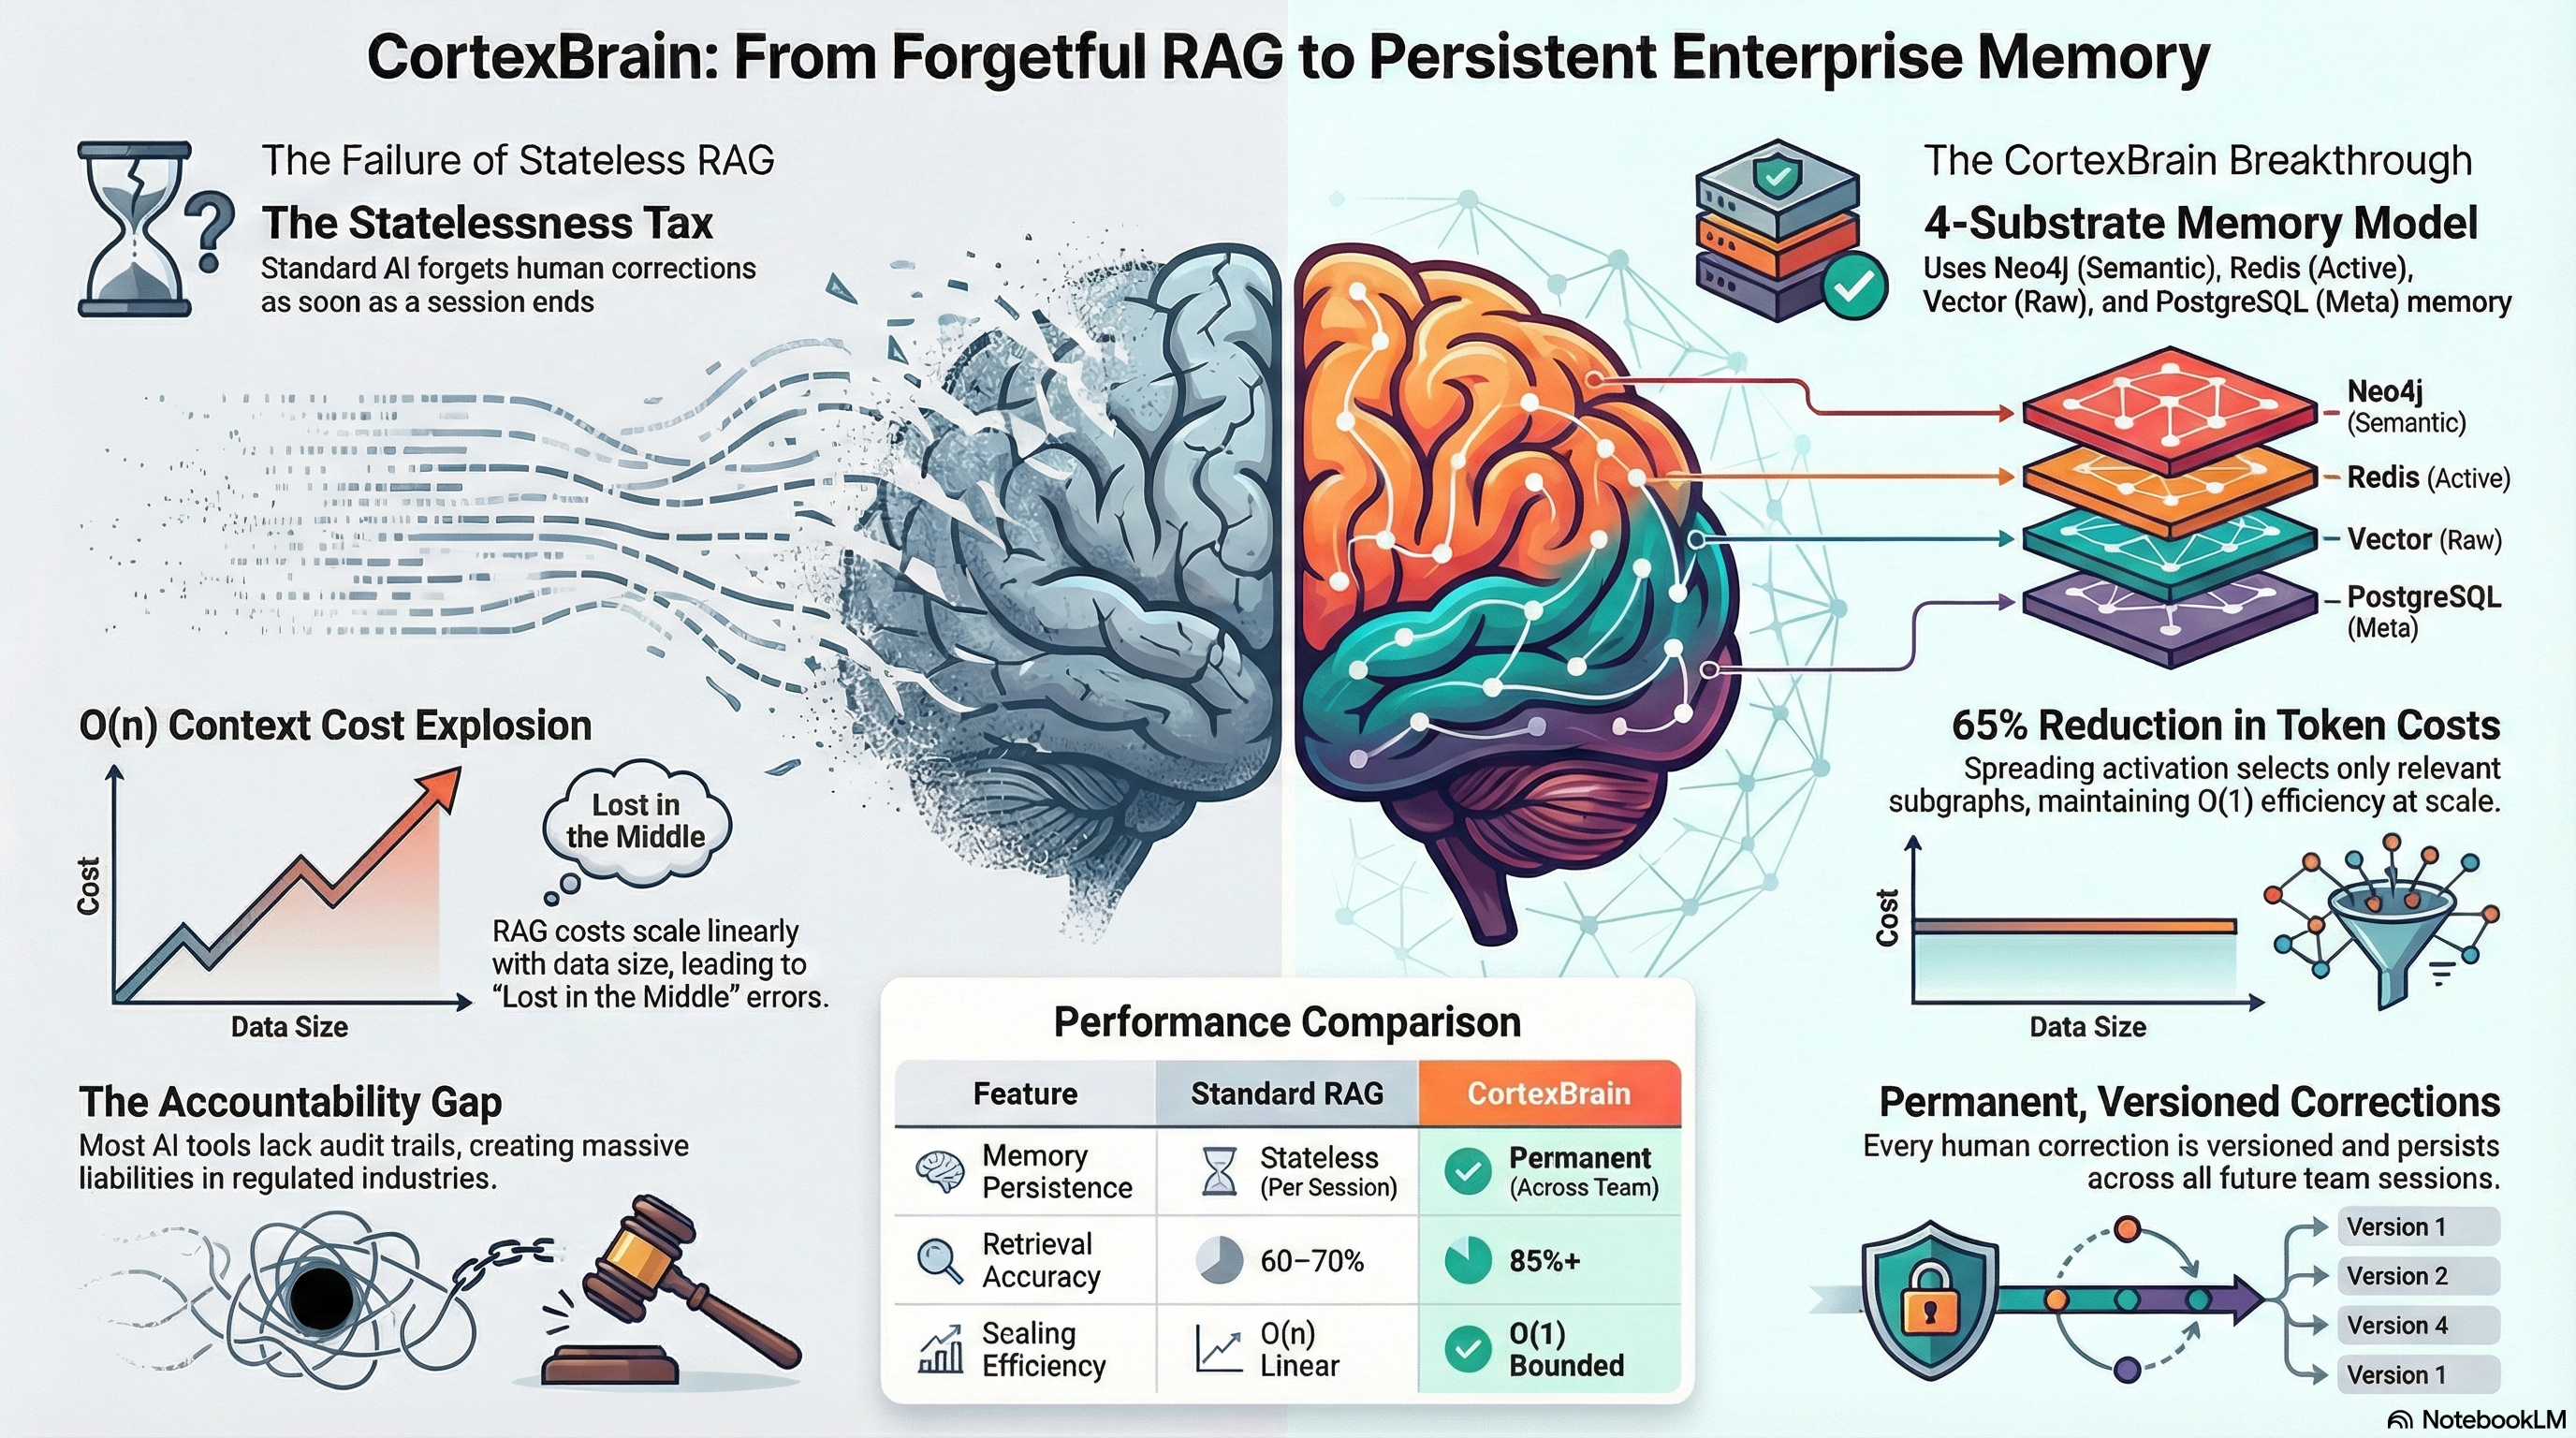
CortexBrain gives your organization a persistent, self-correcting AI brain. Unlike standard RAG systems that start fresh every session, CortexBrain remembers corrections, tracks confidence, and provides a full audit trail for every answer.
What makes CortexBrain different
| Capability | Standard RAG | CortexBrain |
|---|---|---|
| Memory | Stateless — lost every session | Persistent across all sessions & users |
| Corrections | Vanish when session ends | Permanent + versioned with audit trail |
| Confidence | None | 4-level scoring (High / Medium / Low / Conflicted) |
| Context cost | O(n) — stuffs everything | O(1) — spreading activation selects only relevant nodes |
| Audit trail | None | Full: who changed what, when, and why |
| Self-improvement | No | Continuous learning from corrections & fallback answers |
System Requirements
| Component | Minimum | Recommended |
|---|---|---|
| Python | 3.12+ | 3.12 |
| Node.js (for dashboard) | 18+ | 20 LTS |
| Docker & Docker Compose | v2.0+ | Latest |
| RAM | 4 GB | 8 GB+ |
| Disk | 10 GB free | 20 GB+ (scales with data) |
| OS | Linux (Ubuntu 22.04+), macOS 13+, Windows via WSL2 | |
Required services (managed by Docker)
| Service | Version | Purpose |
|---|---|---|
| Neo4j | 5 Community | Semantic Memory (knowledge graph) |
| Redis | 7 Alpine | Active Memory (activation scores) + Celery broker |
| PostgreSQL | 16 Alpine | Meta Memory (audit logs, metadata, organizations) |
Required API keys
| Key | Where to get it | Used for |
|---|---|---|
LLM_API_KEY | Your LLM provider (Gemini, OpenAI, Anthropic) | Query answering, entity extraction |
GEMINI_API_KEY | Google AI Studio | Image generation (optional) |
Installation
Clone the repository
Install Python dependencies
Configure environment
At minimum, set LLM_API_KEY and LLM_MODEL. See Environment Variables for all options.
Start backing services
Start the API server
The API is now live at http://localhost:8000.
Start background workers (required for decay, consolidation, batch ingestion)
Verify the installation
You should see all services reporting "status": "ok".
Configuration
CortexBrain uses a .env file for all configuration. Cognee reads its own env vars automatically; CortexBrain adds a settings layer on top via CortexBrainSettings.
Minimal .env example
See full environment variable reference for tuning activation thresholds, decay rates, and token budgets.
First Run — Quick Start
Once installation is complete, test the full pipeline end-to-end:
Ingesting Knowledge
CortexBrain learns from your organization's documents. Upload files, paste text, or batch-process entire directories. All content is processed through Cognee's ECL (Extract, Cognify, Load) pipeline, which extracts entities and relationships into a knowledge graph.
File Upload (Synchronous)
Upload PDF, Markdown, or plain text files. The system processes them immediately and returns when complete.
internal-docs, runbook_v2, onboarding.Direct Text Ingestion
Ingest text directly via API — ideal for Slack bots, CLI tools, or MCP integrations.
Batch Processing (Async)
For large document sets, use batch ingestion. Files are queued and processed in the background via Celery.
celery -A cortexbrain.workers.celery_app worker --loglevel=info.Querying the Knowledge Base
Queries run through a 10-step pipeline: entity extraction → graph lookup → spreading activation → confidence gating → LLM generation. You get an answer with confidence score, source attribution, and token usage.
Basic Query
Response structure
Session Continuity
Pass a session_id to maintain activation context across multiple queries. Previously activated nodes retain partial activation, making follow-up queries faster and more relevant.
Understanding Confidence Levels
Every response includes a confidence level that tells you how reliable the answer is:
| Level | Score | What it means |
|---|---|---|
| HIGH | ≥ 0.8 | Answer is well-supported by multiple sources or human corrections. Safe to trust. |
| MEDIUM | 0.5 – 0.8 | Answer has some support but may need verification. Response includes a qualifier. |
| LOW | < 0.5 | Limited data available. Treat with caution. System suggests verification. |
| CONFLICTED | Flagged | Multiple sources disagree. All conflicting versions are shown for you to resolve. |
Submitting Corrections
This is CortexBrain's core differentiator. When you correct a fact, it persists forever — the old value is archived with a PREVIOUS_VERSION edge, the new value becomes active, and an audit record is created.
What happens when you correct
- Locate: The node is found in the knowledge graph (or created if new).
- Version: Current state is archived as a
PREVIOUS_VERSIONedge — nothing is lost. - Mutate: Node is updated with the correction. Confidence is set to 0.95. Node is flagged as
volatile: true. - Meta-Update: Audit record is created in PostgreSQL. Original source confidence is adjusted.
- Re-index: Corrected text is re-embedded in the vector store.
From this moment, every user who asks the same question gets the corrected answer.
Audit Trail
Every fact in CortexBrain has a complete version history. See who changed what, when, and why.
Response example
MCP Integration
CortexBrain ships as an MCP (Model Context Protocol) server. This lets AI coding tools like Claude Code, Codex, Cursor, and Windsurf connect to your organization's persistent knowledge brain.
Setting up with Claude Code
Add CortexBrain to your project's .mcp.json:
Every Claude Code session will now have access to your organization's knowledge via the 6 built-in MCP tools.
Other MCP Clients
You can also run the MCP server standalone and connect any MCP-compatible client:
Available MCP Tools
| Tool | What it does | Example usage |
|---|---|---|
cortexbrain_query | Search the knowledge base with confidence scoring | "What port does auth run on?" |
cortexbrain_remember | Store new information persistently | "Remember: we migrated to port 3000" |
cortexbrain_correct | Submit a versioned correction to a knowledge node | Fix wrong values in the graph |
cortexbrain_search_sources | Browse available datasets and their content | List what knowledge sources exist |
cortexbrain_consolidate | Trigger a memory consolidation cycle | Promote, archive, merge, compress nodes |
cortexbrain_health | Check the health of all backing services | Verify Redis, Neo4j, PostgreSQL are up |
REST API Reference
Base URL: http://localhost:8000/api/v1
Authentication: Authorization: Bearer <token>
Core Endpoints
| Method | Endpoint | Description |
|---|---|---|
| POST | /api/v1/query | Query with activation-based context selection |
| POST | /api/v1/correct | Submit a versioned correction |
| POST | /api/v1/ingest | Upload files (synchronous) |
| POST | /api/v1/ingest/batch | Upload files (async via Celery) |
| POST | /api/v1/ingest/text | Ingest text directly |
| POST | /api/v1/ingest/text/async | Fire-and-forget text ingestion |
Audit & Nodes
| Method | Endpoint | Description |
|---|---|---|
| GET | /api/v1/nodes/{node_id} | Node detail (graph + metadata combined) |
| GET | /api/v1/nodes/{node_id}/history | Full version history |
| GET | /api/v1/datasets | List all datasets |
| GET | /api/v1/datasets/{name}/data | Browse data items in a dataset |
Management
| Method | Endpoint | Description |
|---|---|---|
| GET | /api/v1/health | Health check for all services |
| POST | /api/v1/consolidation/run | Trigger memory consolidation |
| GET | /api/v1/consolidation/status/{id} | Poll consolidation progress |
| GET | /api/v1/consolidation/last-report | Last consolidation summary |
| GET | /api/v1/workers/status | Celery worker dashboard |
| GET | /api/v1/sessions/{id}/activations | View activation scores for a session |
| POST | /api/v1/debug/salience-recompute | Manual salience recompute |
| GET | /api/v1/debug/stats | System-wide debug stats |
Admin Dashboard
CortexBrain includes a full admin dashboard built with Next.js 16. It provides a visual interface for querying, ingestion, node inspection, and system monitoring.
Starting the dashboard
Dashboard pages
| Page | URL | What it does |
|---|---|---|
| Query | /query | Chat-like interface with confidence badges, inline corrections, source attribution, image display |
| Ingest | /ingest | Drag-and-drop file upload with sync/batch modes and pipeline visualization |
| Nodes | /nodes | Browse knowledge nodes, search by UUID, view top accessed/salient nodes |
| Node Detail | /nodes/[id] | Full node detail with version history timeline and correction dialog |
| Debug | /debug | System stats, activation viewer, salience recompute |
| Workers | /workers | Celery worker monitoring, active/queued tasks, beat schedule |
| Health | /health | Auto-refreshing service health (every 10s) with health history timeline |
| Settings | /settings | Configure API URL, API key, user ID. Test connection. |
/settings first to configure your API URL (http://localhost:8000) and test the connection. Credentials are stored in localStorage.Background Workers
CortexBrain uses Celery with Redis as the message broker. Workers handle scheduled maintenance and async processing.
| Task | Schedule | What it does |
|---|---|---|
decay_cycle_task | Every 30 seconds | Decrements activation scores in Redis. Evicts nodes at 0. Keeps active context fresh. |
salience_recompute_task | Every 1 hour | Recalculates salience scores for all nodes based on access frequency, recency, corrections, and edges. |
consolidation_task | Every 7 days | Promotes validated knowledge, archives stale nodes, merges duplicates, compresses version chains. |
batch_ingestion_task | On demand | Processes queued document batches through Cognee's ECL pipeline. |
text_ingestion_task | On demand | Async text ingestion for fire-and-forget use cases. |
Memory Consolidation
Consolidation is CortexBrain's self-maintenance system. It runs weekly (or on demand) and performs four operations:
- Promote: Auto-learned knowledge (confidence 0.6) gets promoted to validated (0.75) if it has been accessed 3+ times or has 2+ high-confidence neighbors.
- Archive: Bottom 10% salience nodes that haven't been accessed in 90+ days are marked as
archived. They remain in the graph but are excluded from activation. - Merge: Duplicate entities (matching by normalized name + fuzzy match at threshold 0.85) are merged into a single node. All edges are re-pointed.
- Compress: Version chains longer than 5 entries are compressed to keep only the first and last versions, marking intermediates as
compressed.
Health Monitoring
The health endpoint checks all 5 backing services in real-time:
| Service | What's checked | If it fails |
|---|---|---|
| Redis | PING command | Activation/decay stops; queries use graph-only fallback |
| Neo4j | Cypher query | Graph queries fail; vector-only fallback |
| PostgreSQL | SELECT 1 | Audit logs and metadata unavailable |
| LanceDB | Collection list | Vector search unavailable; graph-only |
| LLM | Test prompt | Answers return from memory only (no LLM generation) |
Architecture
CortexBrain extends Cognee open-source — it does not fork or reimplement. The four memory substrates model how the human brain stores and retrieves knowledge:
Query Pipeline (10 steps)
Algorithms
Spreading Activation
When a query arrives, the system identifies relevant nodes and spreads activation through the knowledge graph using BFS:
Salience Scoring
Decay Cycle
RAG Benchmarks
CortexBrain includes a built-in benchmark suite to measure retrieval accuracy and query speed. Run these after ingesting data to validate your RAG pipeline is performing well.
/api/v1/query endpoint. Install httpx if not already available: pip install httpx.Quick Start
Accuracy Evaluation
Measures how well CortexBrain retrieves relevant nodes and generates correct answers. Uses a golden dataset of Q&A pairs with expected sources and keywords.
Metrics
| Metric | What It Measures | Formula |
|---|---|---|
| Recall@K | % of expected sources found in top K results | matched ÷ expected |
| Precision@K | % of top K results that are relevant | relevant_in_K ÷ K |
| MRR | How early the first relevant result appears | 1 ÷ rank_of_first_match |
| Keyword Score | % of expected keywords present in the answer | found ÷ expected |
| Faithfulness | Does the answer only use info from context? | LLM-as-judge (0.0–1.0) |
CLI Options
Pass/Fail Threshold
The benchmark fails (exit code 1) if average Recall@K < 30% or average keyword match < 30%. This catches major regressions after pipeline changes.
Output
Results are printed to the terminal and saved to tests/benchmarks/eval_results.json with per-query breakdowns, aggregate metrics, and confidence calibration analysis.
Speed Benchmark
Measures end-to-end query latency across varied query types. Reports p50, p95, and p99 percentiles.
Query Types Tested
| Label | Query | Tests |
|---|---|---|
simple_entity | Single entity lookup | Basic graph traversal speed |
multi_entity | Multi-entity complex question | Spreading activation with many seeds |
specific_detail | Precise factual question | Targeted retrieval speed |
broad_topic | Open-ended exploration | Large context assembly + LLM generation |
correction_flow | Questions about corrections | Version history traversal |
out_of_domain | Unrelated question | Continuous learning fallback latency |
algorithm_detail | Technical algorithm question | Deep graph traversal |
infrastructure | Infrastructure question | Cross-domain retrieval |
CLI Options
Pass/Fail Threshold
The benchmark fails (exit code 1) if p95 latency exceeds the threshold (default: 45,000ms). This includes full LLM generation time. Use --threshold to adjust.
Output
Results are printed as a table with p50/p95/p99/mean/stdev per query type, plus activation mode distribution and fallback rate. Saved to tests/benchmarks/speed_results.json.
Golden Dataset
The golden dataset at tests/benchmarks/golden_dataset.jsonl contains 20 Q&A pairs organized by category and difficulty. Each entry specifies expected source nodes and answer keywords.
Dataset Structure
Categories
| Category | Count | What It Tests |
|---|---|---|
architecture | 6 | Memory substrates, activation, Cognee extension |
algorithm | 5 | Salience, decay, confidence, token budget, fallback cascade |
feature | 3 | Continuous learning, correction versioning, image generation |
api | 2 | REST endpoints, correction endpoint |
infrastructure | 2 | Celery tasks, vector database |
integration | 1 | MCP server integration |
security | 1 | Authentication mechanism |
Adding Custom Q&A Pairs
Append new lines to golden_dataset.jsonl to expand coverage. Each line is a JSON object with these fields:
CORTEXBRAIN_URL (default: http://localhost:8000) and CORTEXBRAIN_API_KEY (default: test-key) to point benchmarks at a different instance.Troubleshooting
Common issues
| Problem | Cause | Fix |
|---|---|---|
| Health check fails for Neo4j | Container not running | docker compose up -d neo4j |
python: command not found | macOS uses python3 | Use python3 instead of python |
| Batch ingestion stuck at "queued" | No Celery worker running | Start worker: celery -A cortexbrain.workers.celery_app worker |
| Dataset name error | Spaces or dots in name | Use hyphens or underscores: my-dataset |
| Celery "future loop mismatch" | Using new_event_loop() | Tasks must use asyncio.run() |
| Ingestion times out via dashboard | Next.js proxy timeout | Set experimental.proxyTimeout: 300000 in next.config.ts |
| Docker build fails (apt-get 403) | Network issue with deb.debian.org | Use hybrid mode: Docker for infra, run app locally |
| Query returns no sources | No data ingested yet | Ingest documents first via /api/v1/ingest |
| Low confidence on all answers | Insufficient data or missing corrections | Ingest more documents and submit corrections for key facts |
Environment Variables
LLM & API
| Variable | Default | Description |
|---|---|---|
LLM_MODEL | gemini/gemini-2.0-flash | LLM model via litellm (supports OpenAI, Anthropic, Gemini, etc.) |
LLM_API_KEY | — | API key for your LLM provider |
GEMINI_API_KEY | — | Google Gemini key for image generation (optional) |
Database Connections
| Variable | Default | Description |
|---|---|---|
GRAPH_DATABASE_URL | bolt://localhost:7687 | Neo4j connection URL |
GRAPH_DATABASE_PASSWORD | cortexbrain_dev | Neo4j password |
REDIS_URL | redis://localhost:6379/0 | Redis for active memory |
POSTGRES_URL | postgresql+asyncpg://... | PostgreSQL for meta memory |
CELERY_BROKER_URL | redis://localhost:6379/1 | Celery message broker |
CELERY_RESULT_BACKEND | redis://localhost:6379/2 | Celery result storage |
Activation & Decay Tuning
| Variable | Default | Description |
|---|---|---|
ACTIVATION_THRESHOLD | 30 | Minimum activation score to include a node in context. Lower = more context, higher = more selective. |
DAMPENING_FACTOR | 0.5 | How much activation decays per hop in BFS. Lower = faster decay = tighter context. |
MAX_CONTEXT_TOKENS | 2000 | Maximum tokens to include in the LLM prompt from activated nodes. |
DECAY_RATE | 10 | Score decrement per decay cycle. |
DECAY_INTERVAL_SECONDS | 30 | How often the decay cycle runs. |
CortexBrain Documentation — Built by Abhisek Bose